DIY

Building a Walk-In Coldroom

Once upon a time I read a story about Jamil building a coldroom in a shed in his backyard.  And I thought “I want one”.  When I bought my house in La Mesa it had a walk in ‘basement’ off of the garage.  I had intended to build one there but life happened.  When we moved to TX we were looking for a house that would be suitable for brewing.  Ideally I wanted a 3 car garage but that wasn’t an option for the size house we wanted.  Eventually we found a house that met all our criteria and had a 9’x14′ extension built into the garage.
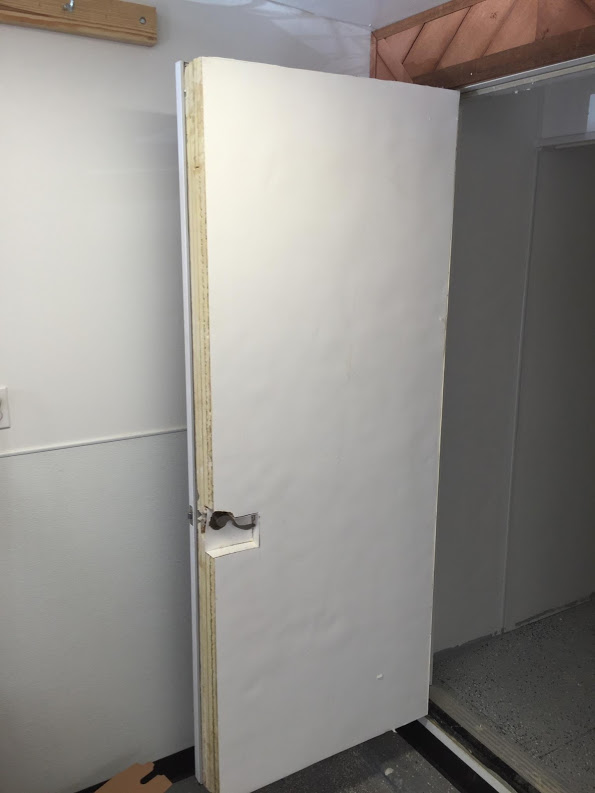
Before:

pre-garage

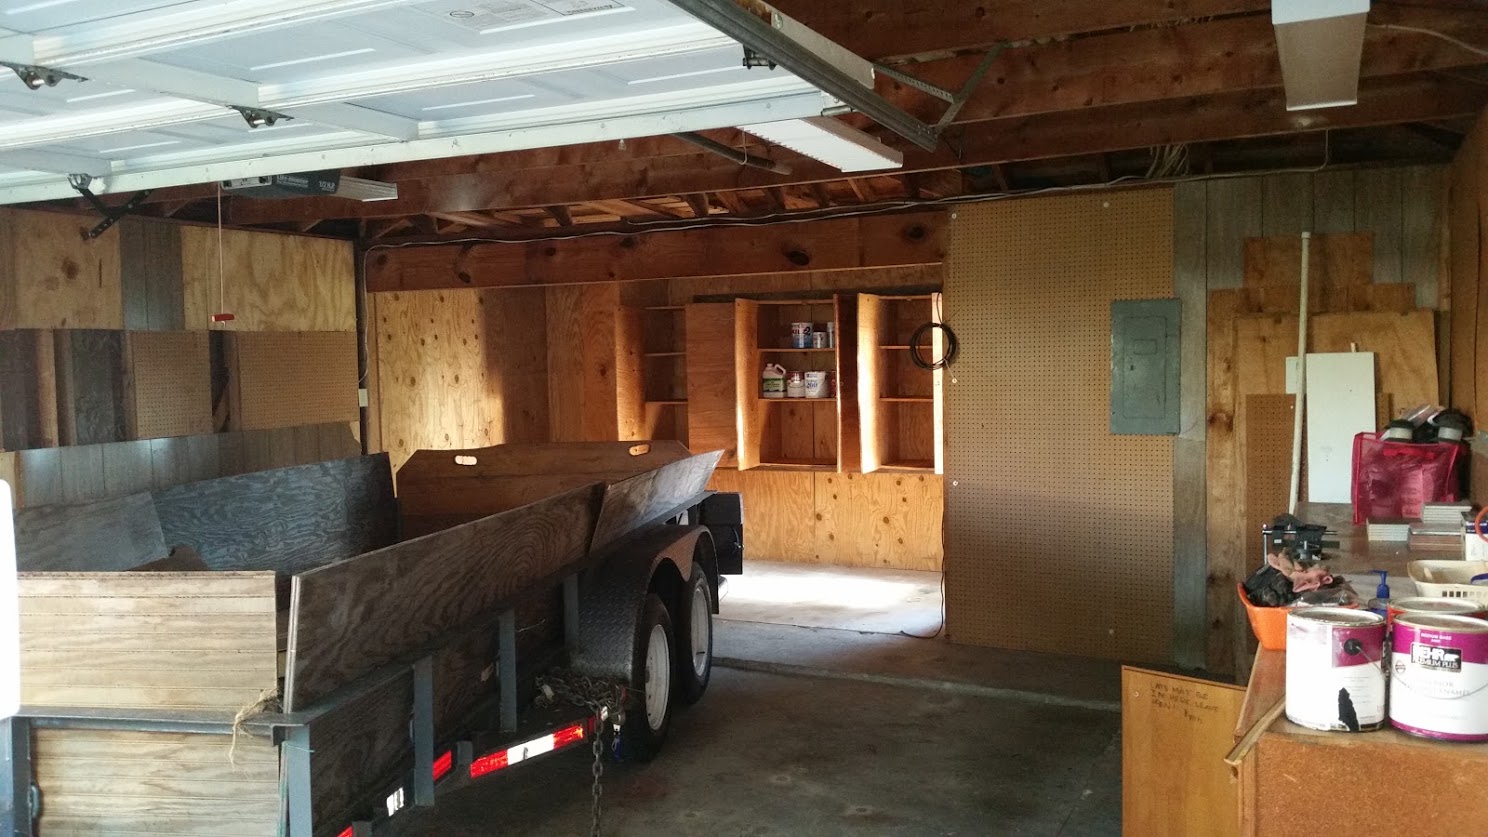
This project also included adding a sink to the garage, adding water, adding a new panel and more power, finishing the garage and epoxying the floor.  Quite a bit of work so I don’t have costs broken down very well because of all the other improvements we did.  This is my brewing paradise….that my wife parks her car in.  She said yes to everything I wanted and with that being her only demand the only proper response is “Yes Dear.”

So we gut it and epoxy the floor.

garage_gut

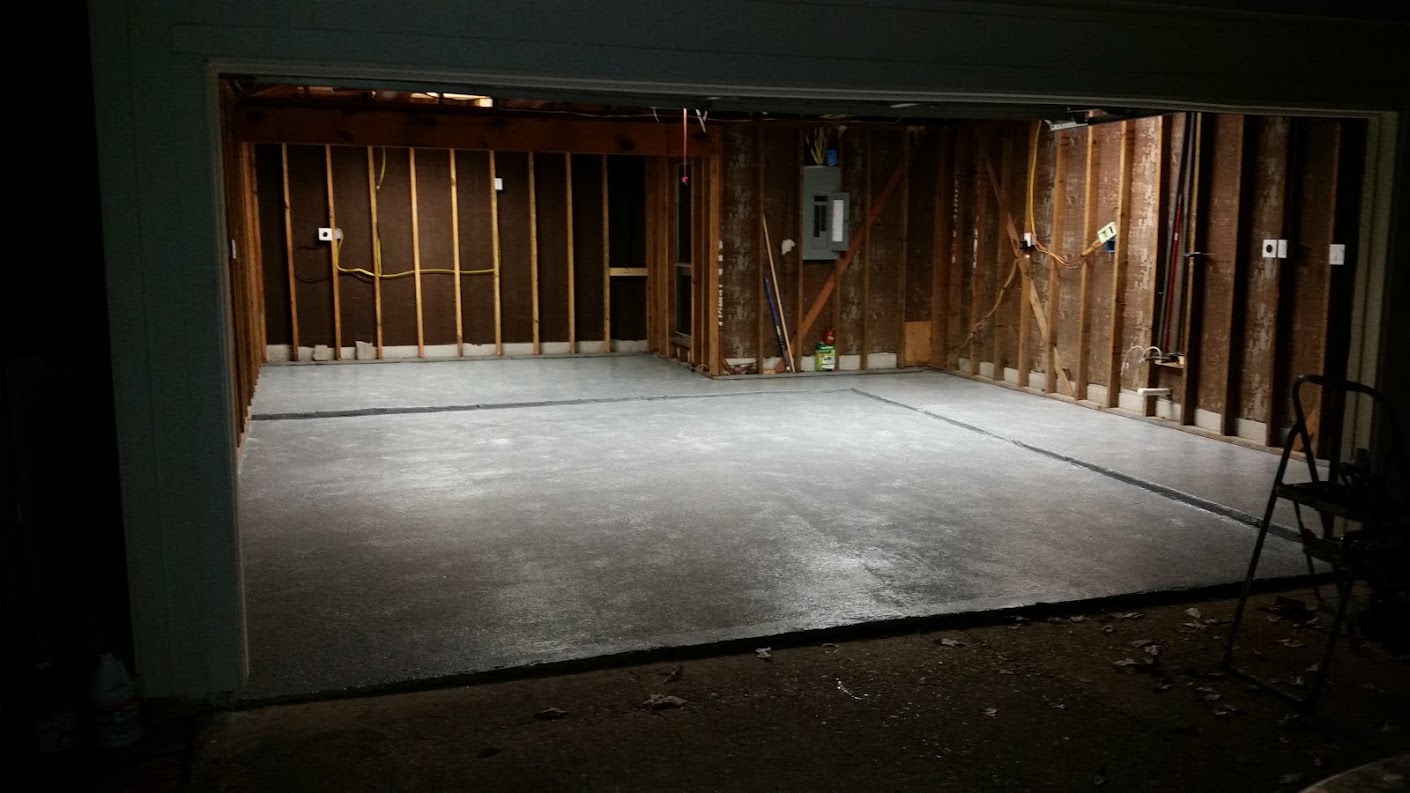
New Panel, more power added, water added.  Added a 220v for the tablesaw and a 220v for the cold room AC.  Which as it turns out is overkill, you only need 220v if you buy a window unit with a heater, so that 220v was later moved to the right and another 110v was added to the coldroom.  The floor epoxy is from Sherwin-Williams.  It’s not cheap so buy it when it goes on sale which is quarterly.  We had to buy 3 kits.  The most important part is doing all the prep work, which includes power washing, degrease, acid wash and powerwash again.  Since this slab was poured in the late 70’s it had a LOT of crud on it.  I cannot count how many hours I spent scrubbing this floor.

The BUILD:

Skill Level:
Moderate

Tools needed:
Hammer
Tablesaw
Nail Gun
Impact driver

Materials
2×6
1″ Plywood
Spray Insulation
Silicone Caulk (buy a case)
Rigid Insulation
Plastic Sheets
Plastic sheeting
Hardboard
AC Unit
Cool Bot
Keg Rack
Bottle Shelves

A lot of the cost is going to be determined by the R value you want and the size of the cold room.  I had initially wanted 4×8 so all the material would be easy to size but Harold talked me out of it explaining “You’ll want to be able to turn around inside”.  Plus, you’ll need keg racks so you need to find a solution that can also carry all the weight.  Consider this in your design, you do not want to block the AC unit which needs to blow the long axis of your room.  And you need to consider what type of door, I went with a 30″ wide metal outdoor door.

You need a minimum of an R25 factor for the cold room and since this is for beer you’ll want it down to 38F.  If you can go with a higher R factor, do it, this will save you $ in the long run.  To size the AC you need the SQ FT, temp and how often you intend to open the door, because that is when your room loses it’s efficiency and the AC unit has to kick back on.  There is a lot to plan and also realize the big box stores will not carry AC-only units when it’s not summer.

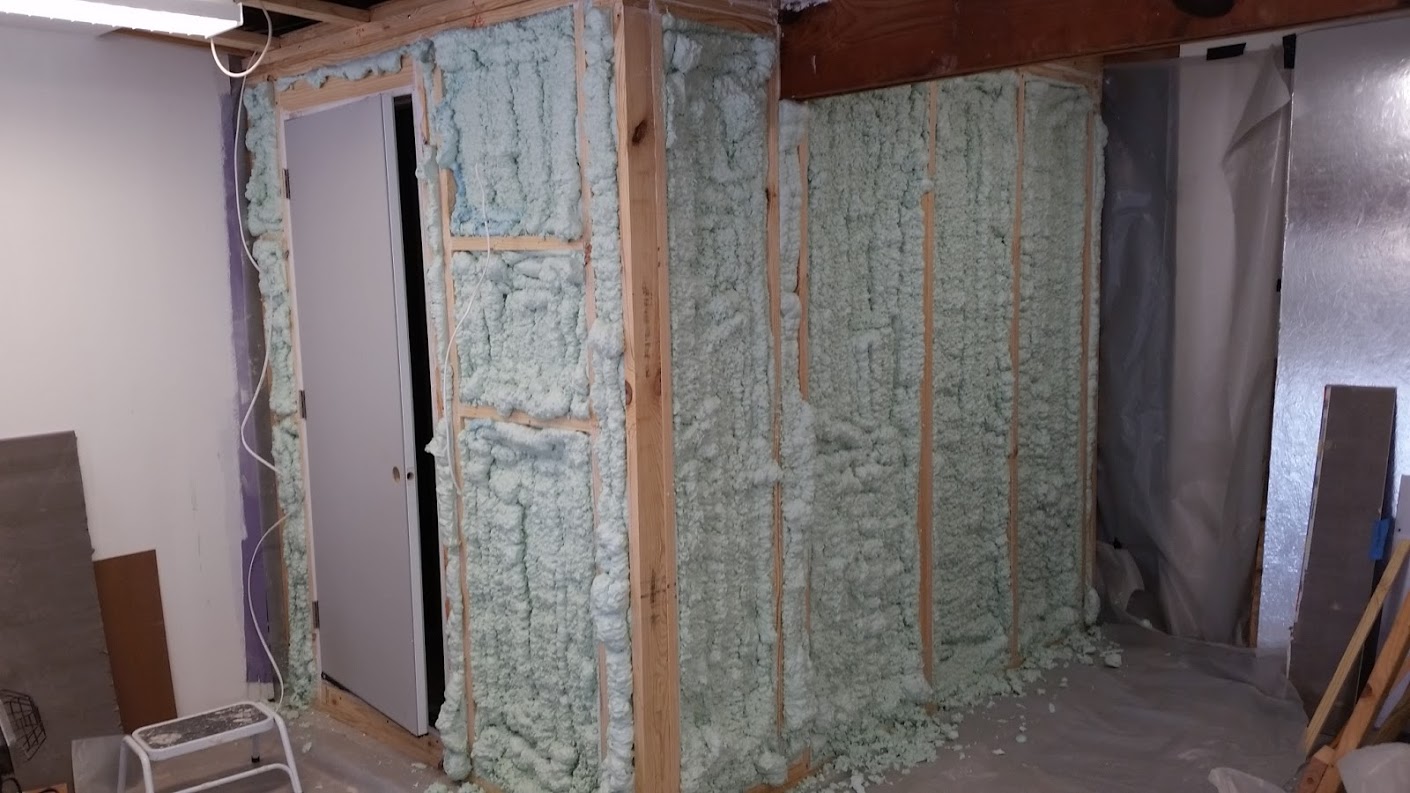
Why did we choose spray insulation? A few reasons:

  1. We were working within a confined footprint and wanted to maximize space.  The closed cell spray insulation has an R6/1in dept.  We went with 4″ true walls (we ripped down 2×6 to true 1.75×4).  Then we added rigid insulation inside.
  2. This is more expensive but it adheres to the wood studs and with the humidity here we thought this would be a better option.

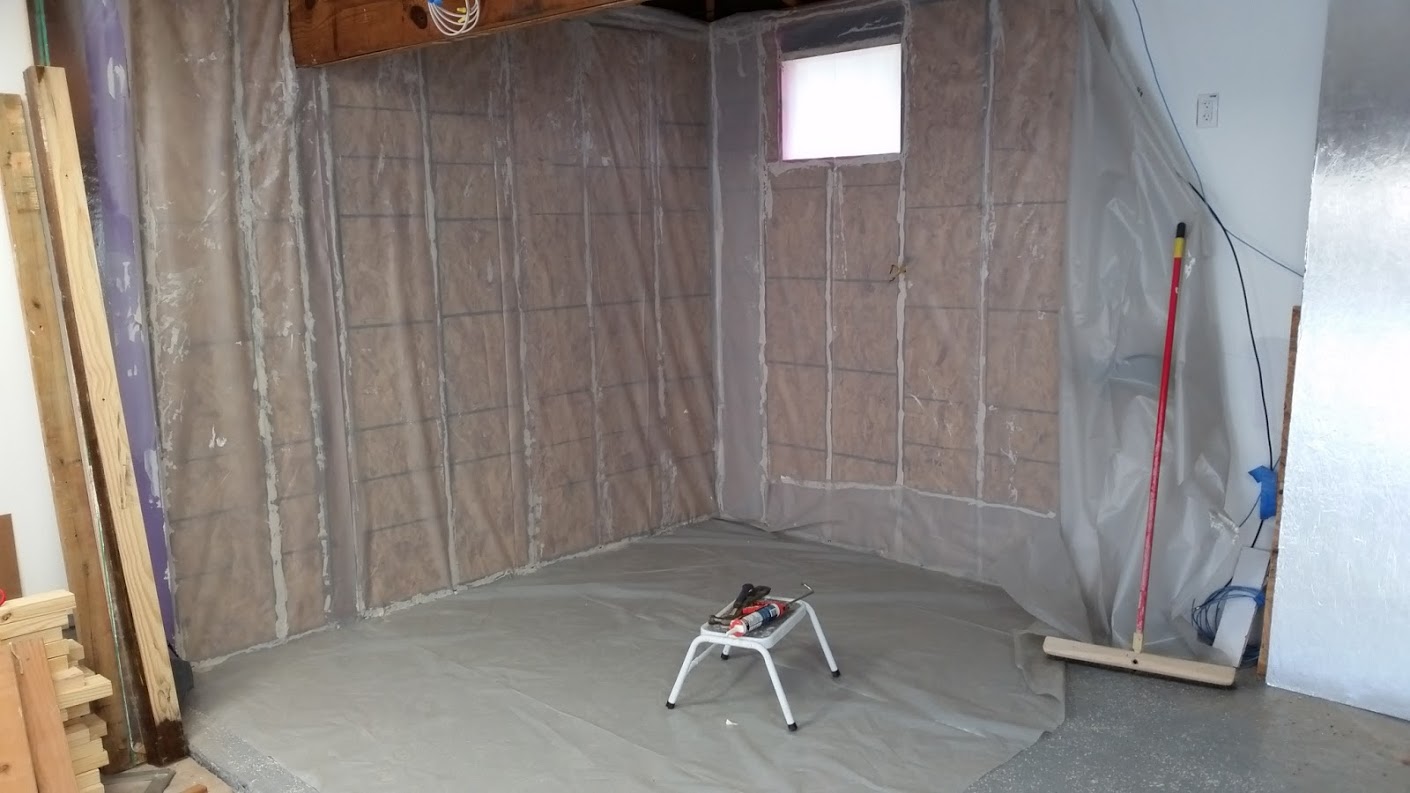
We added rigid plastic sheets inside, but be aware, you shouldn’t be hanging shelves off the walls, if you do you need to add something much more structurally sound and you do not want to damage your insulation.  We also added plastic sheeting, the best way to think about it is there is a firehose pointed at your cold box and you want to make sure outside air/moisture cannot penetrate your walls.  The plastic sheeting goes on the exterior of your wall.  This isn’t really necessary with the spray insulation, but we did it anyway, why risk any small mistakes.

Design everything, place everything on paper of where you’re going to put the AC, shelving, shanks etc…

You need to insulate the floor and the ceiling and forget putting a drain in, it will only be a siphon to lose all your cold air.  Our floor had 1″ plywood floors, that we glued/siliconed it, then added 2 coats of epoxy.

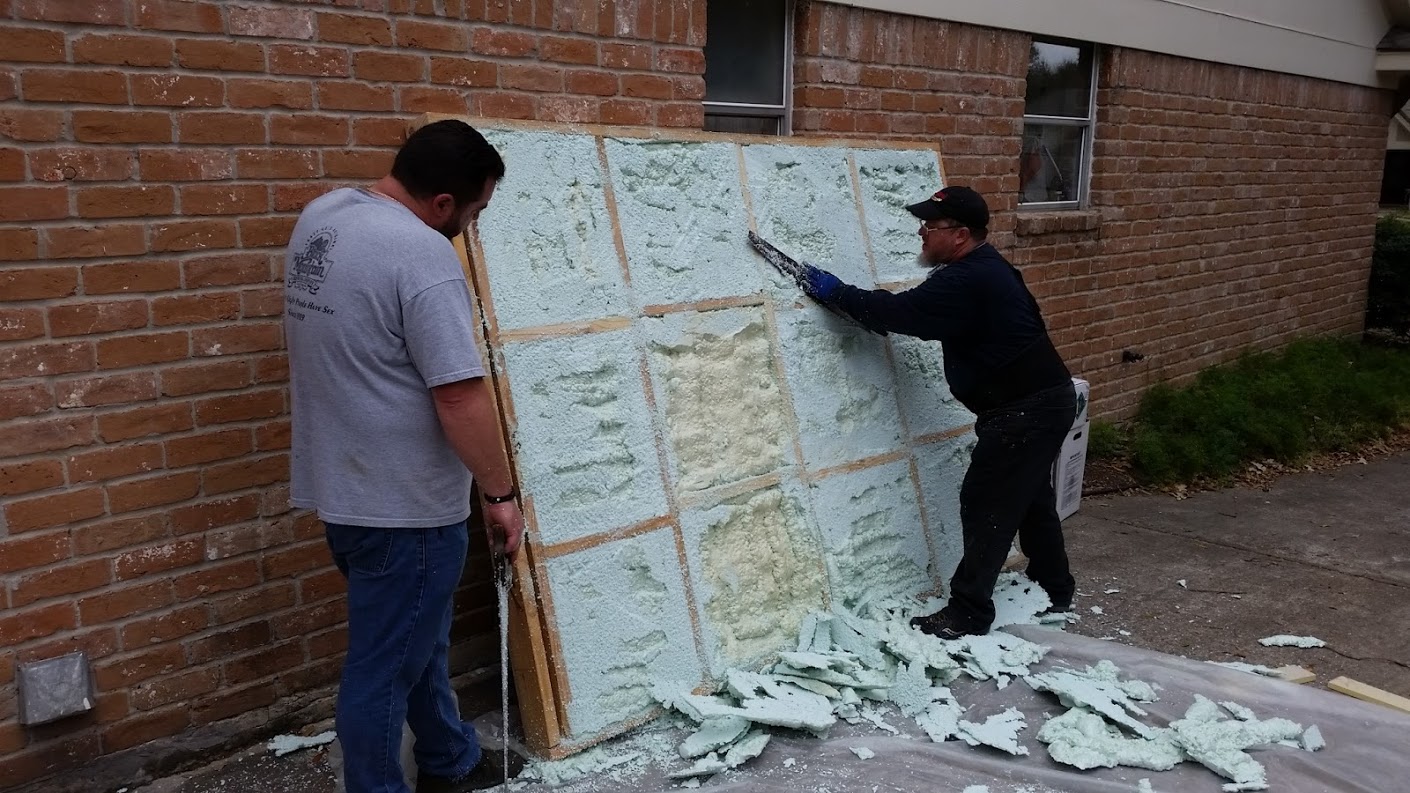
We pre-built the walls and brought them outside to spray.  This was dumb, spray them in a vertical position, it’ll save your back a lot of ache.  It takes some getting used to but you will need to buy 15% more product (if spray) as you get used to it expanding.  You will have to cut any foam down to the studs, so just use an old school manual cross cut saw.

Now for the photos:

prewalls

Back left: floor, back right: ceiling, front right: left wall.  We used the hardboard to spray against.  You could use plywood.  Due to the beam crossing my cold room a lot had to be built seperate and installed in pieces.  The walls go all the way to the concrete and the floor sits inside, the ceiling sits on top of the walls.

EW_spraying

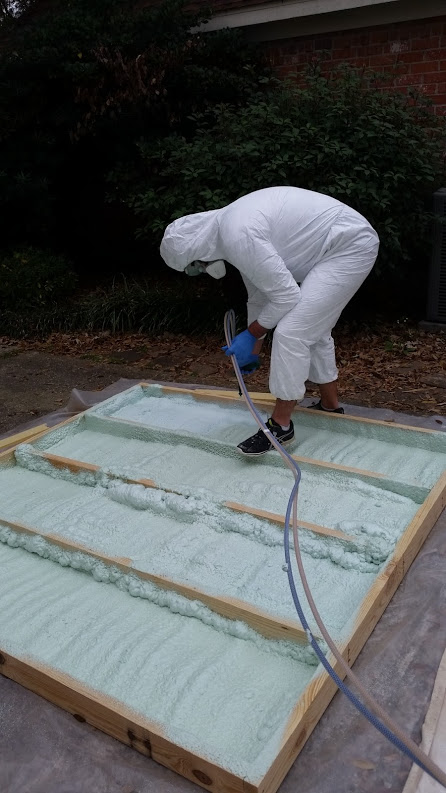
You lay the foam down in 1″ thick passes, and then it expands.  I would work from pieces to piece of all 3 parts, and you had to wait 15mins between passes.  The foam has instructions of how to store the gun and prep it for the next pass.  This wasn’t fun.

walls_sprayed

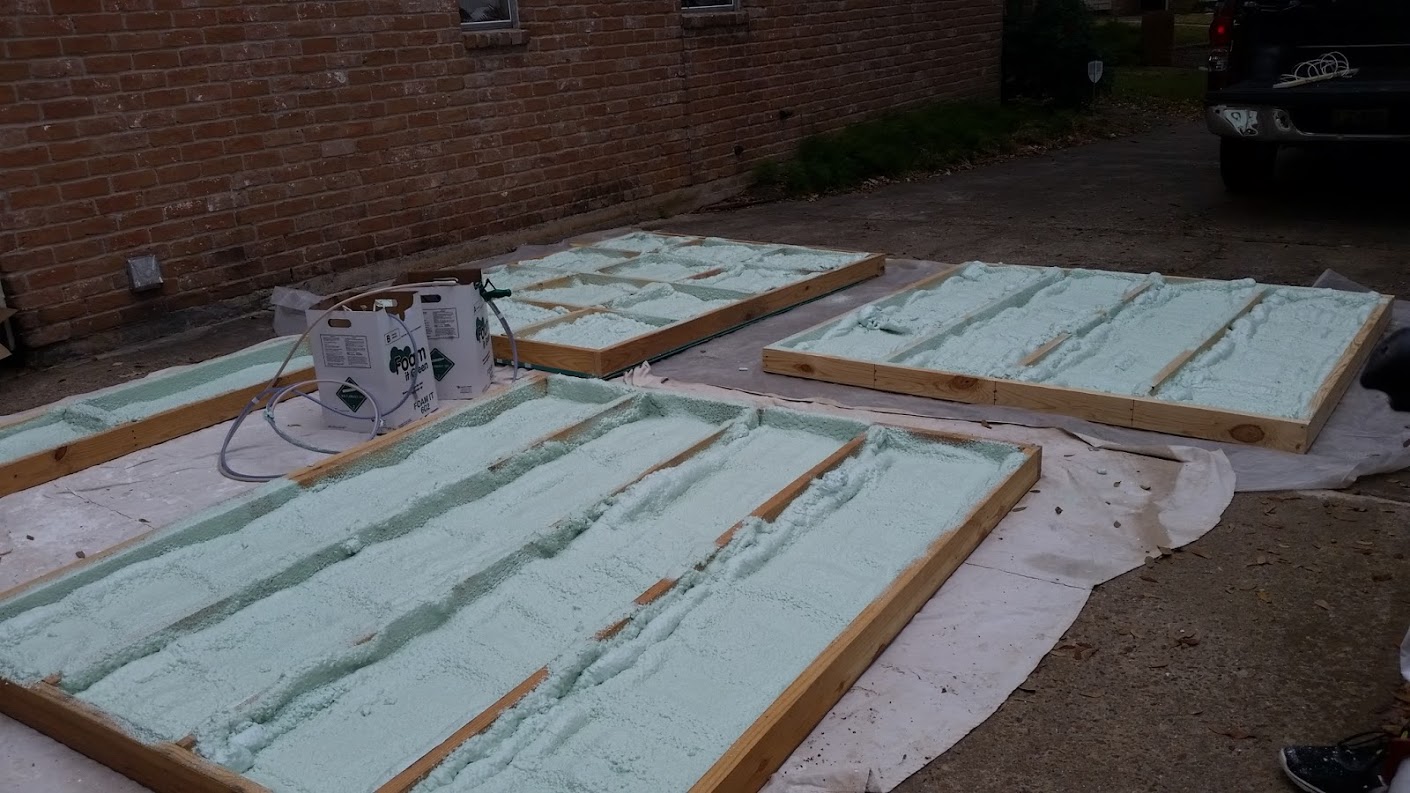
In  progress.  You can see where the back hits the studs how the foam tends to double up as it expands to the side and up at the same time.  It starts to become lumpy but you can work around this by learning as you go of how to add insulation.  And you just keep making progress until the cavity is full.  Then you cut it back:

cutting foam

2 members of my local club (Cane Island Alers) came by to help out.  You can see the waste, wasn’t too  happy about this but since I was the one doing the spraying it’s all on me.  They are working on the floor here.

Meanwhile, in the garage we added reflecting ply to radiate back out infrared waves, this was only done to the 2 exterior walls:

coldroom wall prep

You can see the AC window opening, the reflecting ply is shiny on the other side, and the plastic sheeting in place.  The white on the studs is glue, to help keep everything in place.

walls_up

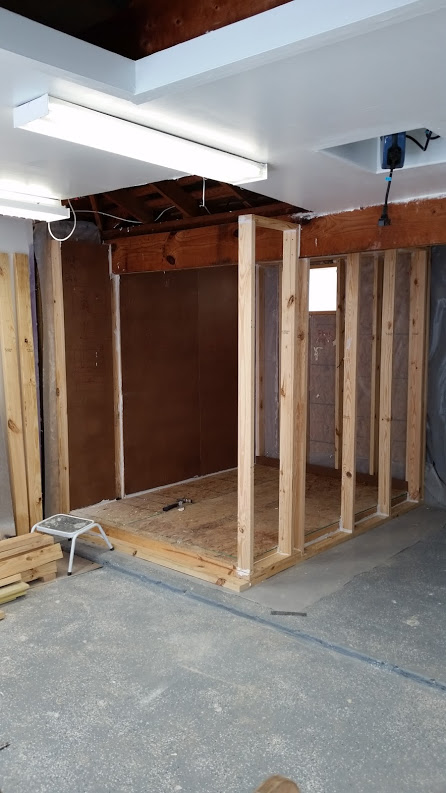
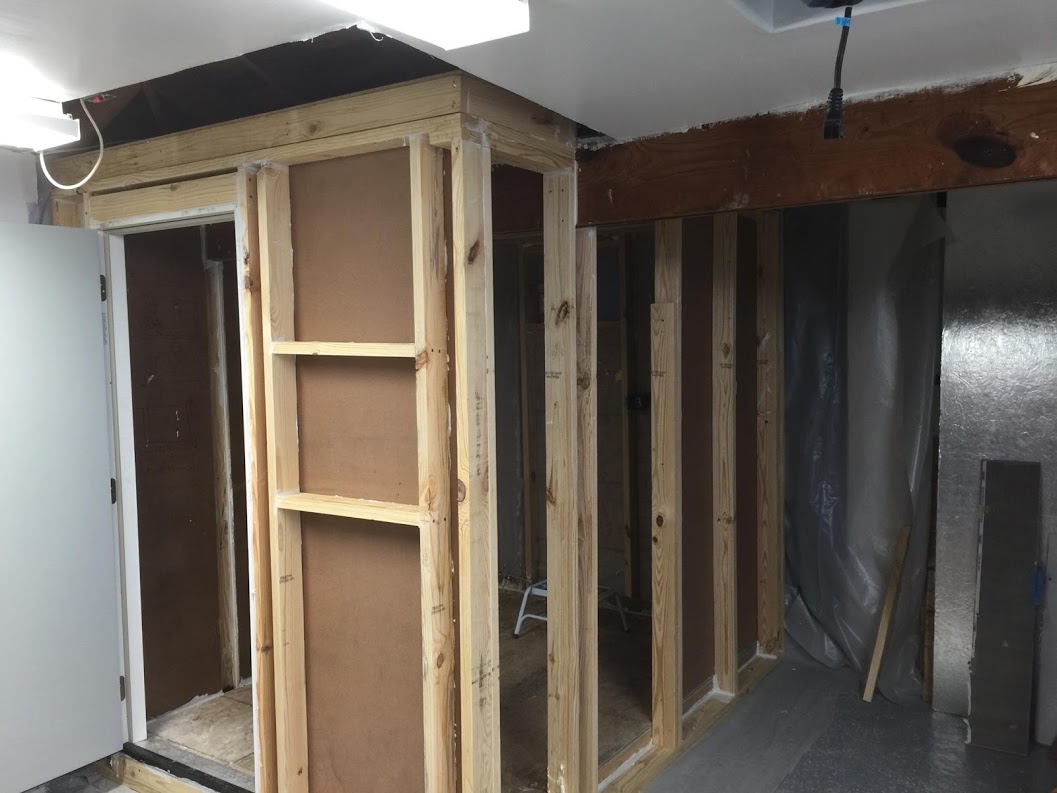
Here’s a good shot of what we had to deal with with the beam.  The left walls are 2 pieces and extend down to the concrete.  Then we added the floor which has silicone where it butts up against the left wall, and it’s toe-screwed in.  The ceiling is in place and it took all 4 of us to lift it up and in.  The back and right walls are then framed in and silicone applied to the top sill, then the ceiling was pulled down onto it and screwed into place.  The rest of the walls will be sprayed in place.  A second ceiling on this side of the beam will also be added.

coldroom framing

Door is added, you can see to the right of the door where the tap area is framed in.  I did spray this but when cutting through for the taps the insulation tended to disintegrate.  In hindsight I would  probably put rigid insulation in this box than spray.  Hardboard is added to the interior and then to the interior of the right wall until it’s ‘walled’ in.

sprayed walls

Suit up and keep spraying, both the exterior and also the interior back wall.  Once this is all done you grab the saw and cut it event with the studs.  In the event you have any big gaps just use the spray canned insulation you buy at Home Depot. After this was cleaned up, we added plastic sheeting to reduce moisture penetrating the walls.

drywall

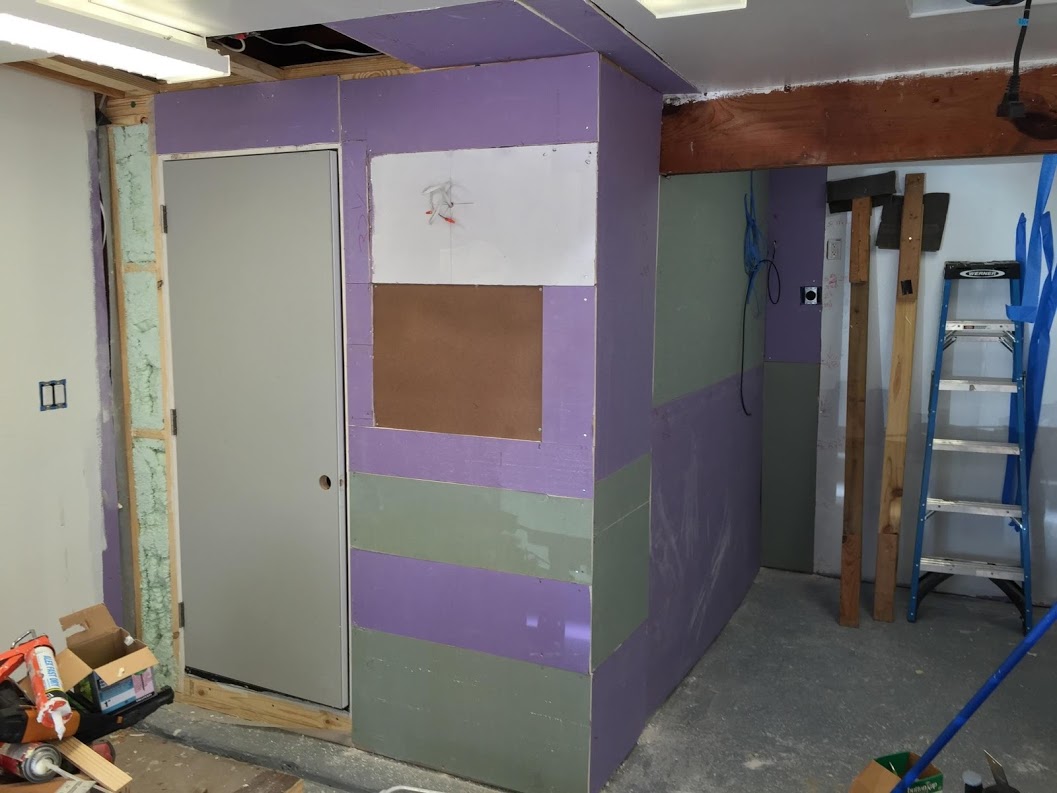
Then add your drywall.  Why is it different colors?  Because Homedepot sells one type and Lowe’s sells another.  On the left you see 2 light switches, one for lights inside the cold room and the other for lights above the taps.

At this point I was worried the R factor wouldn’t be high enough and the interior footprint was larger than 6×8 so I didn’t worry about adding sheets of 1″ insulation to the inside for another R5 factor.  But the ceiling was a bit more difficult:

ceiling cleats

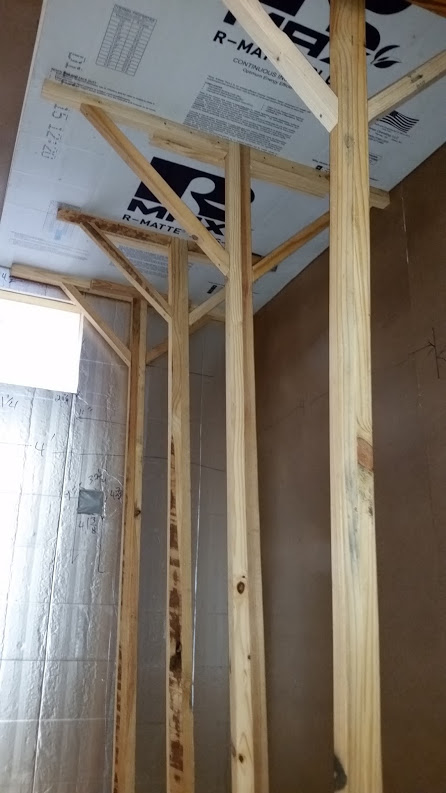
So we built stilts out of all the leftover wood from cutting down the 2×6’s.  Let nothing go to waste.  This was glued in place and siliconed around the edges.  We knew the room was well insulated because with both my dad and I in there working it became hot fast.

interior skinned

There is Fiberglass Reinforced Plastic (FRP) and this other hard (but floppy) plastic sheet without the fiberglass.  It’s a bit less expensive so we went with it, and used the FRP connector pieces.  This is a REAL pain in the ass to put up, even after everything else, this still was tough. Mostly because it’s so flexible and the room insulated so well it just gets hot.

ac install

Follow the AC unit install instructions, actually make sure you read them before you build out the opening.  Then use the HD can spray insulation to seal this puppy up.

AC with Coolbot

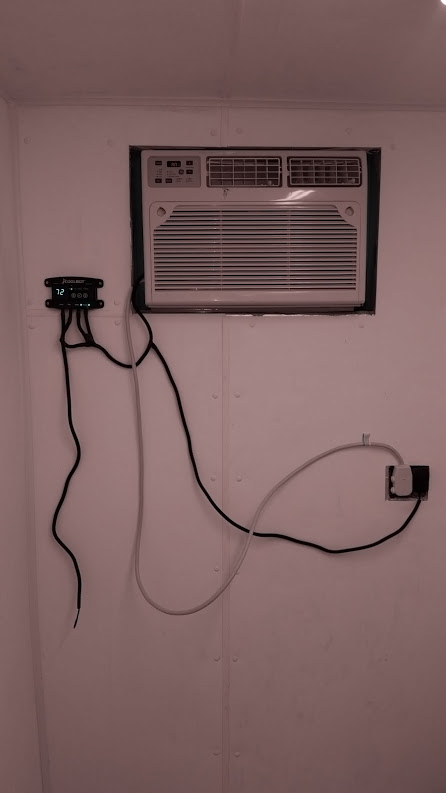
AC with CoolBot.  I later flipped the AC unit outlet so the cord would hang down.

inside

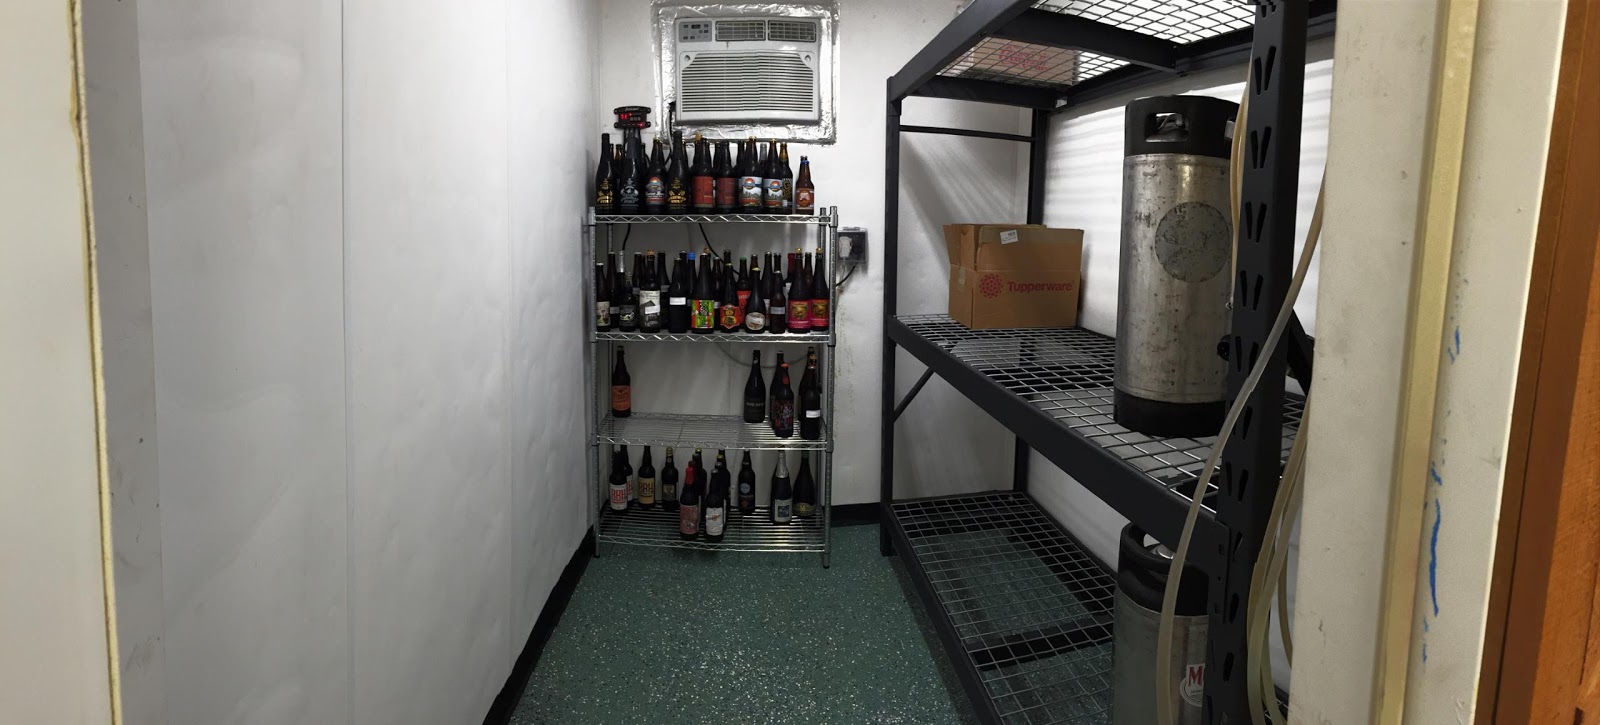
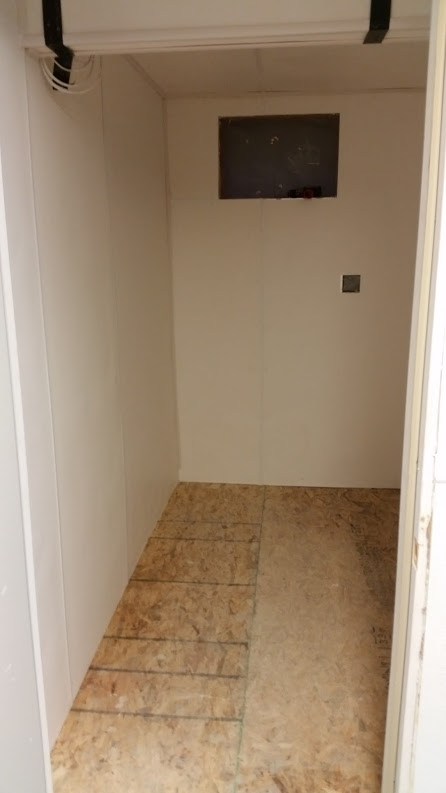
The finished inside of the cold room with epoxy down (green because it was 40% off) and rubber trim to keep any water out of the walls.  Home Depot metal shelving, nothing fancy but heavy duty enough to store kegs.

inside shanks

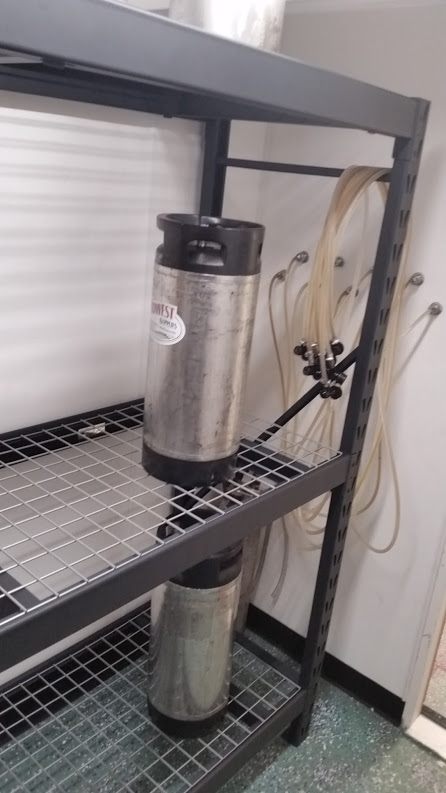
Inside with pin locks shown.

gaslines

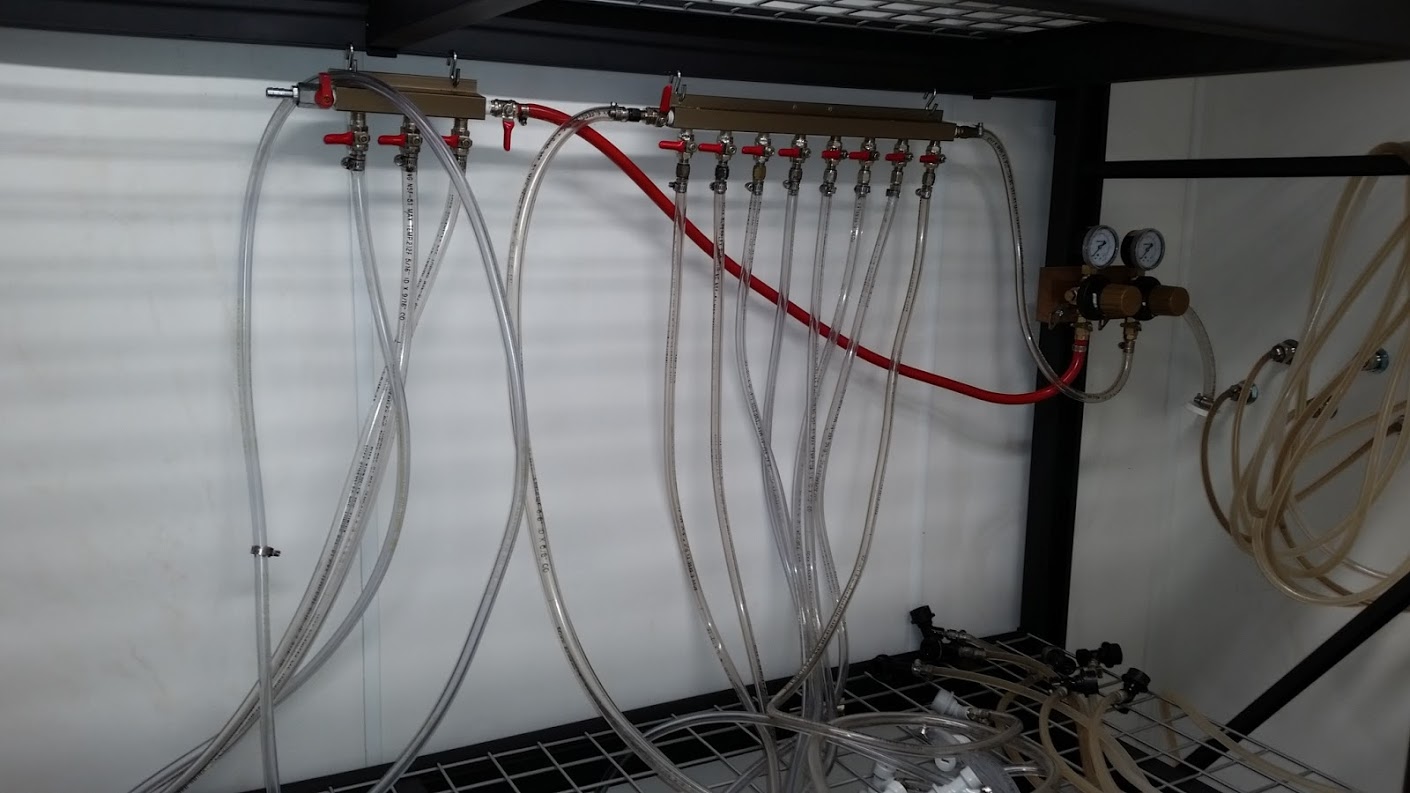
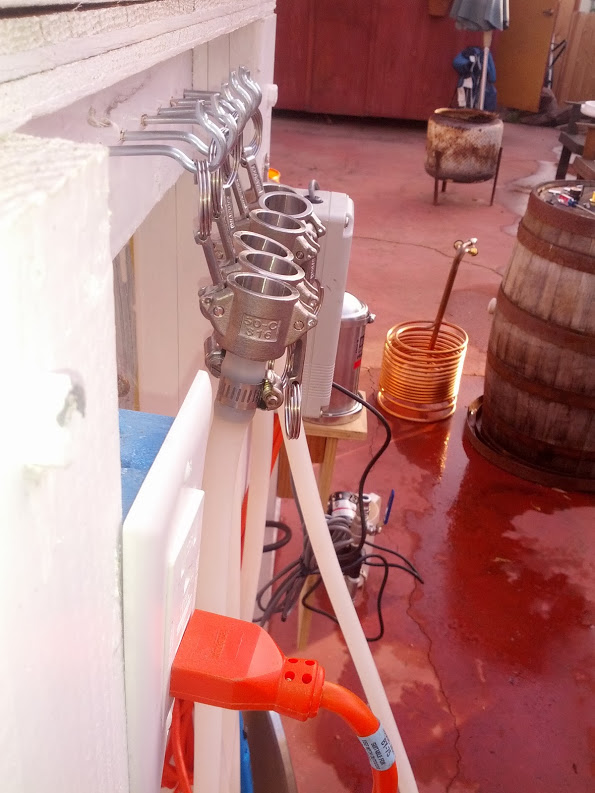
Gas lines with everything mounted to the keg rack.  No extra holes in the walls.  I had to drill through the stand which wasn’t fun, wish I had thought about this before moving the rack in.  Then I used “S” hooks to hang them. 2 stage controller for higher carbonation and for regular ales.

door

We added 3 sheets of insulation to the door and then skinned it in the same  plastic sheet.

outside progress

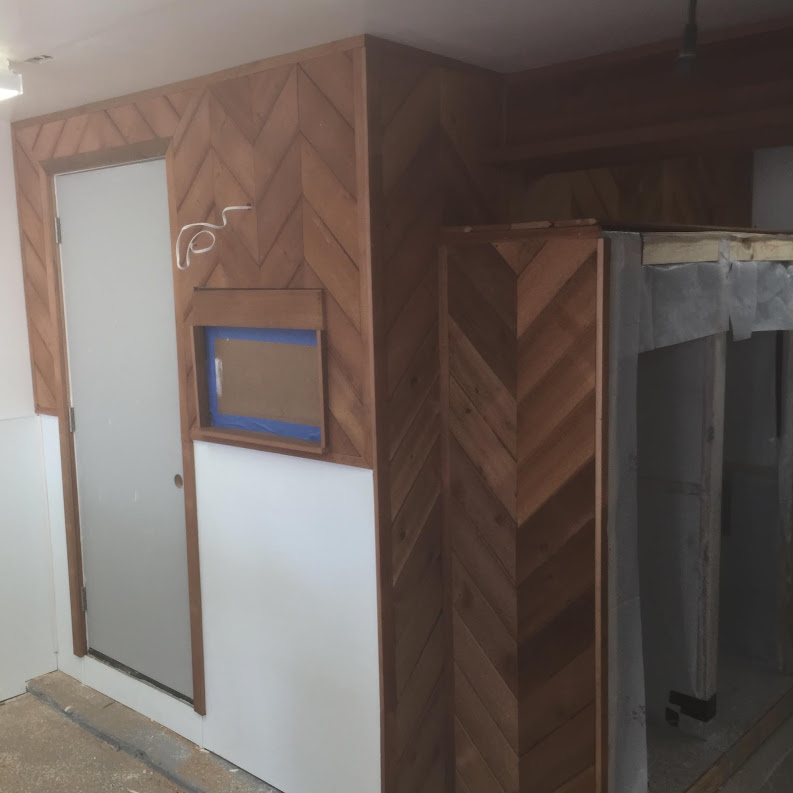
Now it helps if your father has a cabinetry shop.  The white is the FRP and the wood is re-purposed cedar my dad got from a neighbor.  Erin wanted the pattern.  The 2 chambers on the right are for the conicals.  Each in its own insulated room so I can pull glycol from the cold room reservoir to chill them.

finished

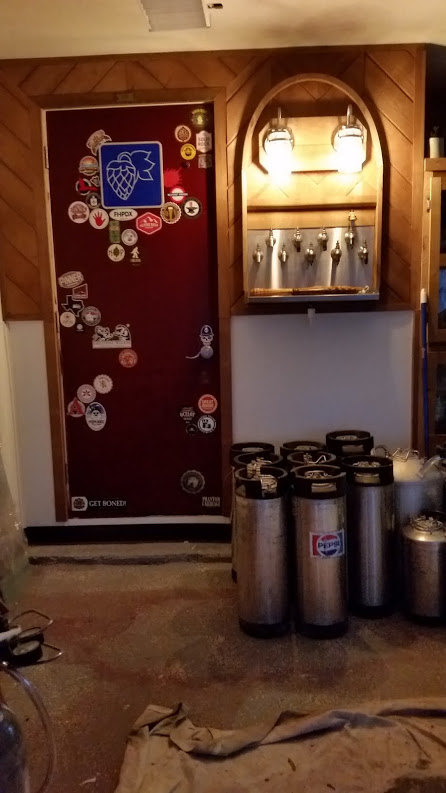
And here is the finished product.  I sprayed the door and one can had a different nozzle than the other which created a cloud.  I now have to re-epoxy the floor.  Very unhappy about that.  The other thing is with much thicker walls, you will need much longer shanks.  trench

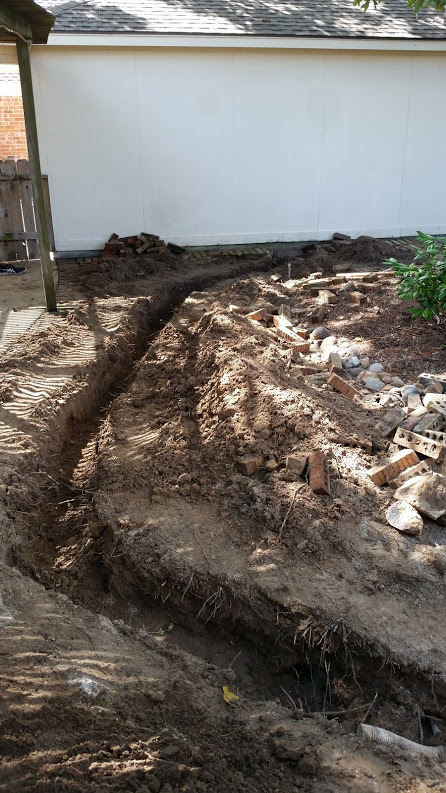
The other major brewing upgrade was to install a sink in the garage.  So we had to trench for the sewer line (sewer exits the rear of the house to a utility easement along the back of the parcel).

sink

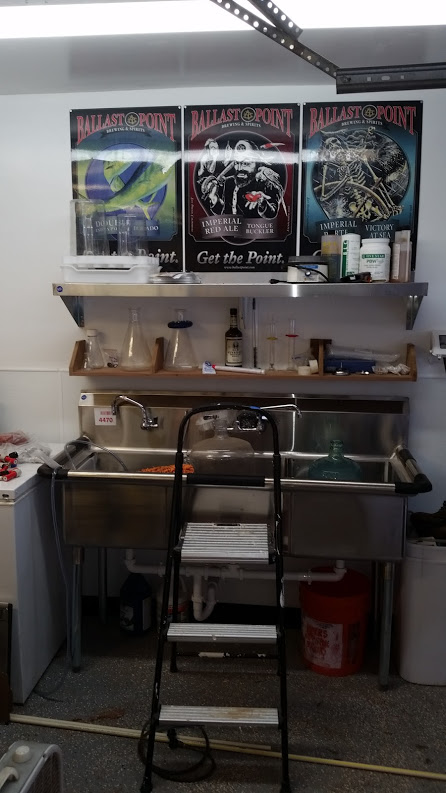
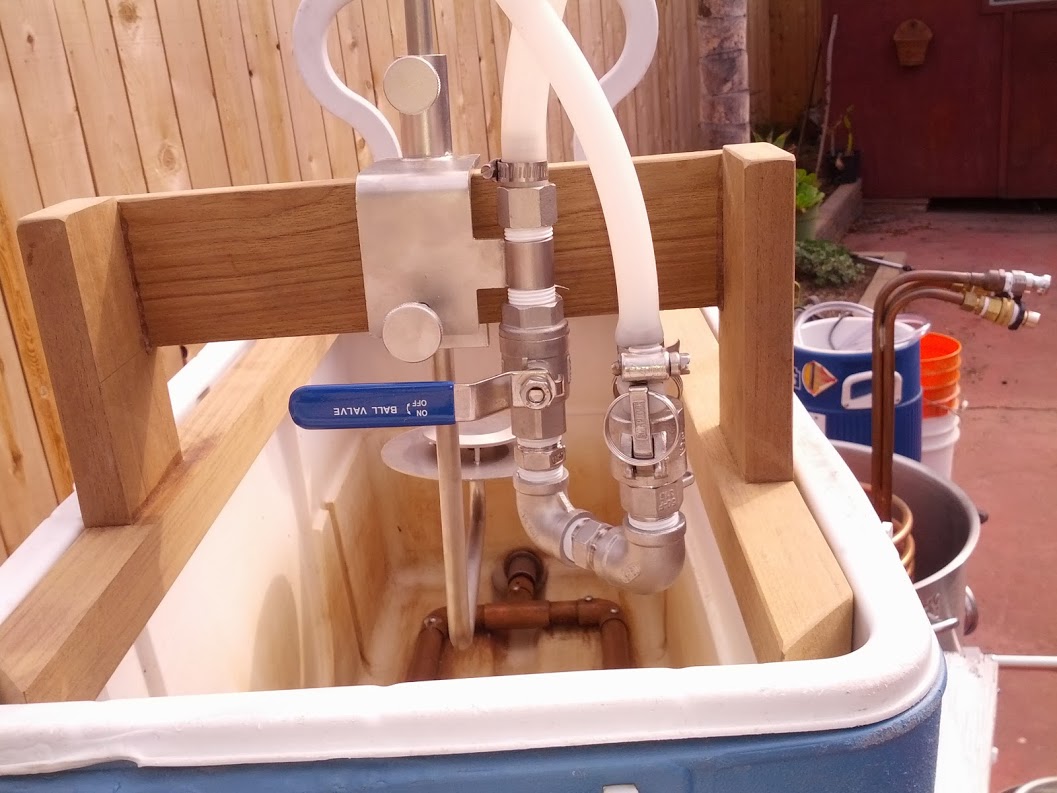
The SS sink and shelf came from a restaurant supply auction house.  These are seconds that wouldn’t pass inspection in a commercial kitchen, but not an issue for my garage.  Plus they were pretty cheap.  I added the second faucet on the left and ran hot water to it for a bottle rinser.  The middle shelf is built out of teak and isn’t as deep to hold all the fragile hardware.  It is really nice having the R bin full of PBW solution, the middle for Star-San and the left for rinsing/drain.  Eventually I’ll add an RO system to this so I can stop buying 25 gallons of water at a time.

The entire garage was finished out with drywall and FRP and rubber baseboard so I can easily clean up.

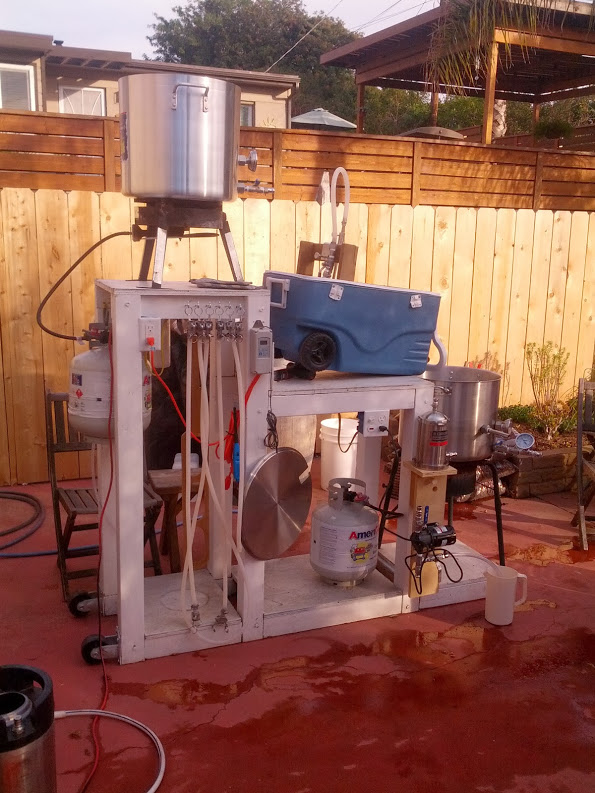
This was not a cheap project since we added a lot to the garage in addition to the cold room.  I’m still not done building out the conical temp control storage but it’s a work in progress.  For awhile we had the cold room at 50F and it was costing 50 cents a day to run, we dropped it to 38F a few weeks back just as it got really damn hot, so I don’t have a basis to compare it to since we’ve yet to live in this house for a year.  It’s maintaining temp and after a day of brewing in 115F heat (w/ index) it’s rather refreshing to step into the cold room for awhile.

EW

Categories : DIY

DIY Brew Rig Pt.2

Continued from Part 1.

Nothing like waiting 2 years for the rest of this build, right?  Sorry about that, sort of changed jobs and moved to a different state.

My system is built to work without a pump and as a batch sparge setup using gravity.  With the pump, I can create a HERMs.  For the HERMs to work I added the MoreBeer Ultimate Sparge Arm on a custom jig in the coolertun.  And I built a larger copper drain setup to help the rectangle cooler drain efficiently, but it simply won’t be quite as effective as a round setup.  The jig I built out of teak since it’ll resist water and not need a finish.  However, if you use teak, it is very oily and you need to use 2 part epoxy in the joins.

coolertunwjigThe issue with the way I built this is that it’s not 100% center.  So if you do build a jig, double check those measurements.  And since you’ve got a HERMs setup, there’s no reason to have a lid.  But of course you need to build a different wort delivery system since this sparge arm is supposed to sit outside of a kettle. So just using SS parts I built:

sparge_UThis works but if you are maxing out your MT it will be submerged.  Not a big deal, just more to clean up later.  As far as SS quick disconnects go I’ve now used both the more beer type QD’s and the Brewer’s Hardware cam-lock (shown here, and used entirely on this system).  Truth be told, I prefer the cam-locks, they involve less burning of your fingers and the key-ring works really really well to hang them on hooks to dry.  The more beer type doesn’t have it and they’re always flopping around.  My 2 cents, I’m not to the point of changing all mine out, but I’m close.

Now you need a March/Chugger pump.  Lots of writeups on these, they’re basically the same.  Just remember these are not-self priming pumps.  Which means they must below the kettle with the liquid you want to move.  I had 2 mounting stations on my setup, just to lower the head height to make it more efficient.  Or just buy longer tubing.

marchpump

This is a march pump with bleeder valve.  You can buy it from more beer complete, or buy the parts and some plumbers tape and DIY.  You need 1 tee, 2 ball valves, 3 nipple, 1 barb and whatever QD’s you’re using. Just make sure everything is 1/2″ full bore or full flow, you don’t want any restrictions.

That takes care of the MT and pump, plus you need a lot of silicone tubing.  How much depends on how far you need to go.  This stuff is not cheap but it can be boiled and will last a LONG time.  I don’t recommend using idophor to sanitize it because it will discolor it and turn it ugly yellow.  Just use Star San.

So what is the point of a HERMS (HEat Recirculating Mash System)?  What this does is when your mash temp lowers below your target temp, the controller turns on the pump and it draws wort from the MT and up through a heat exchanger in the HLT and raises the temp, then returns it to the MT via the Ultimate Sparge Arm.  In a cooler setup, it is still critical you nail your mash temps on the 1st infusion because adjusting takes time and you do not want to run your pump at full throttle. Why?  The digital probe can take awhile to register and it can be easy to over heat.  And cooling down is much more difficult.  Also remember most conversion is done in the 1st 20 minutes, so you only have a small window to get the mash right.

So know your system and how to nail your mash temps right off.  Ok, all that being said you’re probably asking yourself, why in the hell do I even need all this nonsense?  Well, in a cooler setup, you probably don’t.  But…this setup allows you to do 2 other things that manual vorloufing in a batch sparge setup is difficult.  #1, mashing out and #2 auto vorloufing.  You generally keep your HLT at 170F, and with my system here, it means you light the HLT burner when needed by keeping an eye on the temp gauge.  If it’s a little hotter it won’t kill you, don’t sweat it.

When your mash is done, turn the pump on (manually or by setting the controller to 168F and letting it turn it on).  Keep the HLT burner low, to keep the temp there on target.  Now the worst part of batch sparging is automated and at the VERY least you’ll get some kickass clear wort after 15 minutes and you’ll have raised the mash temp, ending conversion.  This alone is worth all the BS.

HLT:  What do you need?

Thermowell in the MT.Heat Exchanger in the HLT.
HLT Pot (mine was aluminium)
Ball valve
Weldless Kit x2
Temp Guage

First, put a thermowell in your MT if you want to automate this (12″ is better).

MT_Thermowell

Simply use a bit to cut a bigger circle than the thermowell hex head.  Remember you need to get a wrench in there to tighten it.  I can’t tell you what I used because I have since given this MT away.

Next is the heat exchanger in the HLT.  It’s just copper, you can DIY and bend your own, buy the MoreBeer version, or the Jada version or whatever other copper coil you find that fits your budget AND fits in your kettle.  My kettle was aluminium, nothing fancy.

I don’t really have any photos that show this, but it’s pretty standard.  Lastly you need a controller.  If you’re spending all this dough at this point, you should have 2 stage temp control on your fermentation. I use a 2 stage Ranco controller, so I’d just take it off my fermenter, change the temp setting and use it for my brewday, using the hot side only.  These days there are a lot of other options, just make sure the probe will fit through the MT thermowell.

hillbillysetup1

So this is my cheapo setup.  It never caught on fire!  The HLT is way high, which can be a concern so if the earth starts shakin’ you better start runnin’.  I have more going on here so if you have a basic knowledge of household wiring, you can do the following.

Near the left propane tank you can see a red/black wire, that’s  just a basic extension cord that I cut the female end off of, and wired it to the dual plugs with the orange (Ranco) wire plugged into it.  That is then also tied into the dual plug setup above the lower propane tank.  Just above it you can see a wire loop, this is a drip wire, just in case it gets wet, water will flow down to the lowest point of the wire and drip down, and not into your junction box.  The switch turns on both outlets, so I can just leave my pump plugged into it for manual on/off without having to pick the pump wire off the ground to plug it in.  Or the pump can be plugged into the controller to run the MT.  Later in the brewday you’ll want to just plug it into the switch controlled setup.  I used a switch with an indicator light, but this is 100% useless in broad daylight as it’s not strong enough to be seen.

The other nice part about using wood and the cam locks, if you want a hook somewhere, just drill and install one.

hooks

I miss this even as I now have a better system, managing your hoses is something I need to figure out.  BC this rocked.

Other nice thing about wood is you can mount just about anything to it, including water filtration:

filtration

Keep everything in one place, this is just a carbon block filter.

As used during mashing, note that most of the hoses are now in use.

pumpstation2

You’ll note the wheels, when it was empty and all hardware/propane was removed, I could tilt it up and wheel it over to storage.  Was a fancy tarp.  The chiller is in the BK, and when you would add it and 15min hop additions/whirlfoc, you’d also set the pump up to recirculate from BK ball valve to the pump and then back to the recirc arm on the chiller.  This is a morebeer chiller (yes, I buy most of my crap from them).

Even when using ground water, the flow of wort past the coil makes chilling extremely more efficient, which is another reason to buy a pump, hosing and fittings.  It just makes the day run faster and then you can pump wort directly into your fermenter, regardless of height.

superchill

After knocking the hottest temps off and you get below 100F you can setup a ‘superchill’ setup.  In this photo the wort if flowing from the BK valve, to the pump, and back to the recriculation arm on the chiller.  Instead of hoses to the chiller, I have a closed loop running a large aquarium pump pushing ice water to the chiller and then returning it to the bucket.  Both pumps are now on the same switched circuit, so when I kill it, they both turn off.  Works super well and you have to be sure you don’t chill below your target wort temp.  Because it is easy to hit lager temps with this.  Uses about 10lbs of ice.

Note also the pump is now below the BK.

Building this is a lot cheaper than a sculpture, but you need some wood working tools, drills and electrical knowledge.  It’s pretty easy overall and fun to build.

Have fun!

EW


Categories : DIY

DIY BrewRig Pt 1

EW’s Planned Brewhouse

Homebrewers, by large, are a quirky bunch.  Why on earth would we brew our own beer when we can travel to any bottleshop and buy it ready-to-go or visit anyone of our 70+ local breweries and have growlers filled with some of the best beer on the planet?  Their really isn’t an answer other than “Because we can.”  In that desire to brew our own we as a group are forever upgrading, improving and buying or building whatever we need to get that incrimental edge to mimic the pro’s to get one step closer to great beer.

Budgets vary so the toys we buy can vary a great deal as well.  While a $5,000 MoreBeer flat or tippy system would be fantastic to own or having John McKay build you a really sweet system designed to your spec’s full of shiny brushed stainless steel, sometimes that’s just not possible. Regardless if it would look fantastic glimmering in our SoCal sun.  There are alternatives.  I call it Hillbilly Homebrewing (no offense to any hillfolk), where building your own stand out of whatever materials are handy can be just as good as the Porsche Brewing System.

In the end it’s not how it’s made, just that it’s made well.

Can you make great beer in a $150 starter kit?  The answer is yes, if you understand the conditions of the yeast temperature needs, proper yeast pitch, ability to chill the wort fast and a host of other advanced homebrewing knowledge which one doesn’t start with.  I know I sure didn’t.  Some very simple things help the brewday along and expdite the ease of making beer.  After all, if homebrewing is too much backbreaking labor there’s no real reason to do it yourself.  And thus we start on the journey from our first starter kits to garages and closets full of empty bottles, wort chillers, miscellaneous equipment, coolers, glass carboys, kegs, fermenters and of course all the craft commercial beer we buy on the way for inspiration.

The best piece of homebrewing equipment I’ve purchased so far is a house.  After all, I needed more space to put all the brewing junk which now includes chest freezers, a conical, bigger brewing pots, more bottles, more kegs and more of everything else.  The last beer I made was Nov of 2012.  Earlier this year I was ready to give up the hobby and focus more on woodworking.  That is until my bride said “NEIN” and told me we met over my passion for beer and homebrewing and I wasn’t allowed to quit.  I told her, “If I’m not out, I’m going all in.”

Which 440 words later brings me to the point of the New Brew Rig.

As mentioned earlier I enjoy wood working and have a ton of leftovers conviently stacked in the *other* pile in my garage next to the piles of homebrewing hardware.  With both hobbies you pick up stuff along the way and ‘rathole’ them.  A march pump here, a box of misc sanitary fittings there, piles of leftover 4×4’s and 1/2 sheets of plywood and then 4 years later, you get to put it all together.

The initial theory is: build a single gravity fed stand to batch sparge.  From there buy a larger 15g HLT and then add the pump in to vorlouf, add a few thermowells and some leftover temp controllers and start a Hillbilly HERMS.

The unfinished stand.

The stand is constructed with leftover ply and 4×4’s. I believe I had to purchase 4 6′ 4×4’s in order to suppliment the material I was missing.  Heights were chosen based on the existing burners and cooler I had, as well as being tall enough to gravity feed directly into a carboy w/o a pump.

Wired Brewstand

And now with paint and being wired up.  Simple household paint, the heat shield on the bottom of the burners will keep it from catching fire.  I cut up an extension cord and wired it into a GFI then to a switch with a pilot light (which you can’t see in daylight) to 2 outlets.  All the wires have driplines.  I’m not sold this is the best way to wire this up and I may build a control panel later.  I haven’t brewed with it yet.

This design is based on the equipment I had.  Still a work in progress and I’m waiting on an order from Brewer’s Hardware to get this rig fully functional.  Stay tuned for Pt II.

-EW

Categories : DIY

Motorizing your Mill

A big advantage of having your own mill at home is you can mill the grain on demand, stock certain grains that the local HBM doesn’t carry, you can set the gap as you’d like, vs. being a the mercy of the store’s mill and it’s kinda cool.
Read More

Categories : DIY

Converting a Mini-Fridge

There are 2 reasons you’d want to convert a mini-fridge:

1) turn it into a kegerator
2) turn it into a temp-controlled fermenter

In either case finding a refrigerator only (no freezer) is the easiest option.  Bending and moving a freezer inside a dorm fridge is not something I’ll cover.  If going the kegerator route the one thing you need to do to serve 2 corny kegs is to drill the top, make sure you don’t drill through the back 1/3 of the top as there is 1 coolant line for Sanyo/Kenmore brands.

 
Read More

Categories : DIY

© Copyright 2022, All Rights Reserved
Powered by WordPress. Designed by WordPress Themes by ProGo