


EW’s Planned Brewhouse
Homebrewers, by large, are a quirky bunch. Why on earth would we brew our own beer when we can travel to any bottleshop and buy it ready-to-go or visit anyone of our 70+ local breweries and have growlers filled with some of the best beer on the planet? Their really isn’t an answer other than “Because we can.” In that desire to brew our own we as a group are forever upgrading, improving and buying or building whatever we need to get that incrimental edge to mimic the pro’s to get one step closer to great beer.
Budgets vary so the toys we buy can vary a great deal as well. While a $5,000 MoreBeer flat or tippy system would be fantastic to own or having John McKay build you a really sweet system designed to your spec’s full of shiny brushed stainless steel, sometimes that’s just not possible. Regardless if it would look fantastic glimmering in our SoCal sun. There are alternatives. I call it Hillbilly Homebrewing (no offense to any hillfolk), where building your own stand out of whatever materials are handy can be just as good as the Porsche Brewing System.
In the end it’s not how it’s made, just that it’s made well.
Can you make great beer in a $150 starter kit? The answer is yes, if you understand the conditions of the yeast temperature needs, proper yeast pitch, ability to chill the wort fast and a host of other advanced homebrewing knowledge which one doesn’t start with. I know I sure didn’t. Some very simple things help the brewday along and expdite the ease of making beer. After all, if homebrewing is too much backbreaking labor there’s no real reason to do it yourself. And thus we start on the journey from our first starter kits to garages and closets full of empty bottles, wort chillers, miscellaneous equipment, coolers, glass carboys, kegs, fermenters and of course all the craft commercial beer we buy on the way for inspiration.
The best piece of homebrewing equipment I’ve purchased so far is a house. After all, I needed more space to put all the brewing junk which now includes chest freezers, a conical, bigger brewing pots, more bottles, more kegs and more of everything else. The last beer I made was Nov of 2012. Earlier this year I was ready to give up the hobby and focus more on woodworking. That is until my bride said “NEIN” and told me we met over my passion for beer and homebrewing and I wasn’t allowed to quit. I told her, “If I’m not out, I’m going all in.”
Which 440 words later brings me to the point of the New Brew Rig.
As mentioned earlier I enjoy wood working and have a ton of leftovers conviently stacked in the *other* pile in my garage next to the piles of homebrewing hardware. With both hobbies you pick up stuff along the way and ‘rathole’ them. A march pump here, a box of misc sanitary fittings there, piles of leftover 4×4’s and 1/2 sheets of plywood and then 4 years later, you get to put it all together.
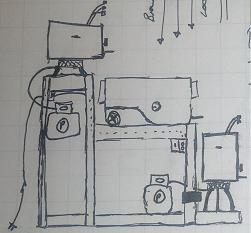
The initial theory is: build a single gravity fed stand to batch sparge. From there buy a larger 15g HLT and then add the pump in to vorlouf, add a few thermowells and some leftover temp controllers and start a Hillbilly HERMS.
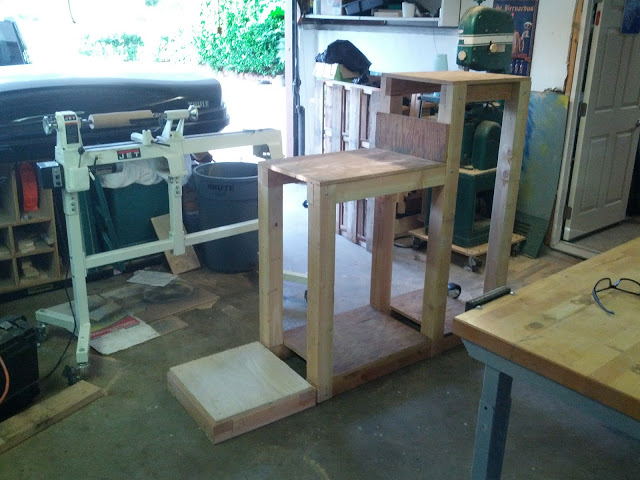
The unfinished stand.
The stand is constructed with leftover ply and 4×4’s. I believe I had to purchase 4 6′ 4×4’s in order to suppliment the material I was missing. Heights were chosen based on the existing burners and cooler I had, as well as being tall enough to gravity feed directly into a carboy w/o a pump.
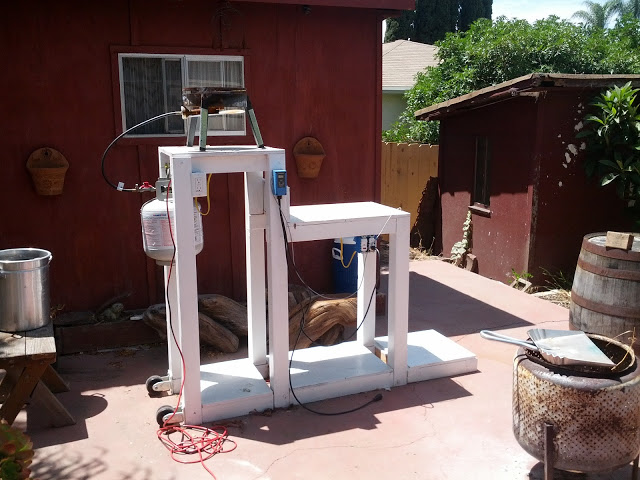
Wired Brewstand
And now with paint and being wired up. Simple household paint, the heat shield on the bottom of the burners will keep it from catching fire. I cut up an extension cord and wired it into a GFI then to a switch with a pilot light (which you can’t see in daylight) to 2 outlets. All the wires have driplines. I’m not sold this is the best way to wire this up and I may build a control panel later. I haven’t brewed with it yet.
This design is based on the equipment I had. Still a work in progress and I’m waiting on an order from Brewer’s Hardware to get this rig fully functional. Stay tuned for Pt II.
-EW

Hi from another beer nut. I just discovered your blog, can’t believe I haven’t run across it before. We seem to share the same interest in beer. Are you on untappd? I love connecting with other beer geeks.
[…] Continued from Part 1. […]